
Playstation
Seccions d'aquesta pàgina 7
01General#
02Emulació / Emulation#
03Misc#
04Bandes sonores / Soundtracks#
05Perifèrics / Peripherals#
- Emmagatzematge / Storage
- PS5
- External storage
- Internal storage
- The Best PS5 SSDs in 2024: Speedy NVMe storage for your console
- Best internal SSD for PS5 2022: The top M.2 drives for your PlayStation 5
- Cómo saber si un SSD es compatible con PS5: guía de compra de unidades de almacenamiento para PlayStation 5
- Discos SSD para PS5
-
marca model velocitat dissipador preu
512 GB 1 TB 2 TB 4 TB Corsair MP600 Pro SSD 7000 MB/s ✔
122€ 219€
Gigabyte AORUS Gen4 7000s
-
172,11€ ?
Sabrent Rocket 4 Plus
- 82€ 139€ 244€
Samsung
SSD 980 PRO 7000 MB/s - 89,99€ 129€
109€164€
164€
SSD 980 PRO Heatsink 7000 MB/s ✔
198€
SSD 990 PRO 7450 MB/s -
159€
SSD 990 PRO Heatsink 7450 MB/s ✔
134€
163€199€
253€444€ Seagate FireCuda 530 7300 MB/s ✔ 89€ 137€ 229€
WD_BLACK SN850 (antic) 7000 MB/s ✔ 121€ 182,35€
SN850X 7300 MB/s -
152€ 323€ SN850X 7300 MB/s ✔
112€ 182€
182€
172€428€ XPG GAMMIX S70 Blade 7400 MB/s ✔ 59€ 99€ 148€
Aquesta taula continua cap a la dreta — desplaça-la o gira el mòbil.
- PS5
- Volant / Steering wheel
-
PS3 PS4 PS5 Logitech Driving Force GT ✔ GIMX ? Logitech G29 ✔ ✔ ✔ Logitech G923 ✔ ✔ ✔ Aquesta taula continua cap a la dreta — desplaça-la o gira el mòbil.
- Linux
- kernel module
- Force feedback for Linux (ff)
- new-lg4ff
- Experimental Logitech Force Feedback module for driving wheels
- Instal·lació / Installation
- Dependències / Dependencies
- Mageia
urpmi
                                              kernel-desktop-devel-latest dkms
- Mageia
- Passos / Steps
- DKMS
(Cómo
compilar módulos con DKMS)
cd ~/srcgit clone https://github.com/berarma/new-lg4ff.gitsucd ~/src/new-lg4ffversion=$(awk -F= '/PACKAGE_VERSION/ {gsub(/['\"']/,"",$2);print $2}' dkms.conf)ln -s /home/${USER}/src/new-lg4ff /usr/src/new-lg4ff-${version}dkms add -m new-lg4ff -v ${version}dkms build -m new-lg4ff -v ${version}dkms install -m new-lg4ff -v ${version}modinfo hid-logitech...
- DKMS
(Cómo
compilar módulos con DKMS)
- Dependències / Dependencies
- config
- oversteer
- Instal·lació / Installation
- Dependències / Dependencies
- Mageia
urpmi meson python3-pyxdg
                                              python3-evdev
- Mageia
- Passos / Steps
meson buildninja -C buildninja -C build runsudo ninja -C build installoversteer
- Dependències / Dependencies
- Instal·lació / Installation
- pyLinuxWheel
- oversteer
- kernel module
-
06GIMX#
- GIMX (Game Input
MultipleXer)
- "use a computer as a hub for your gaming devices"
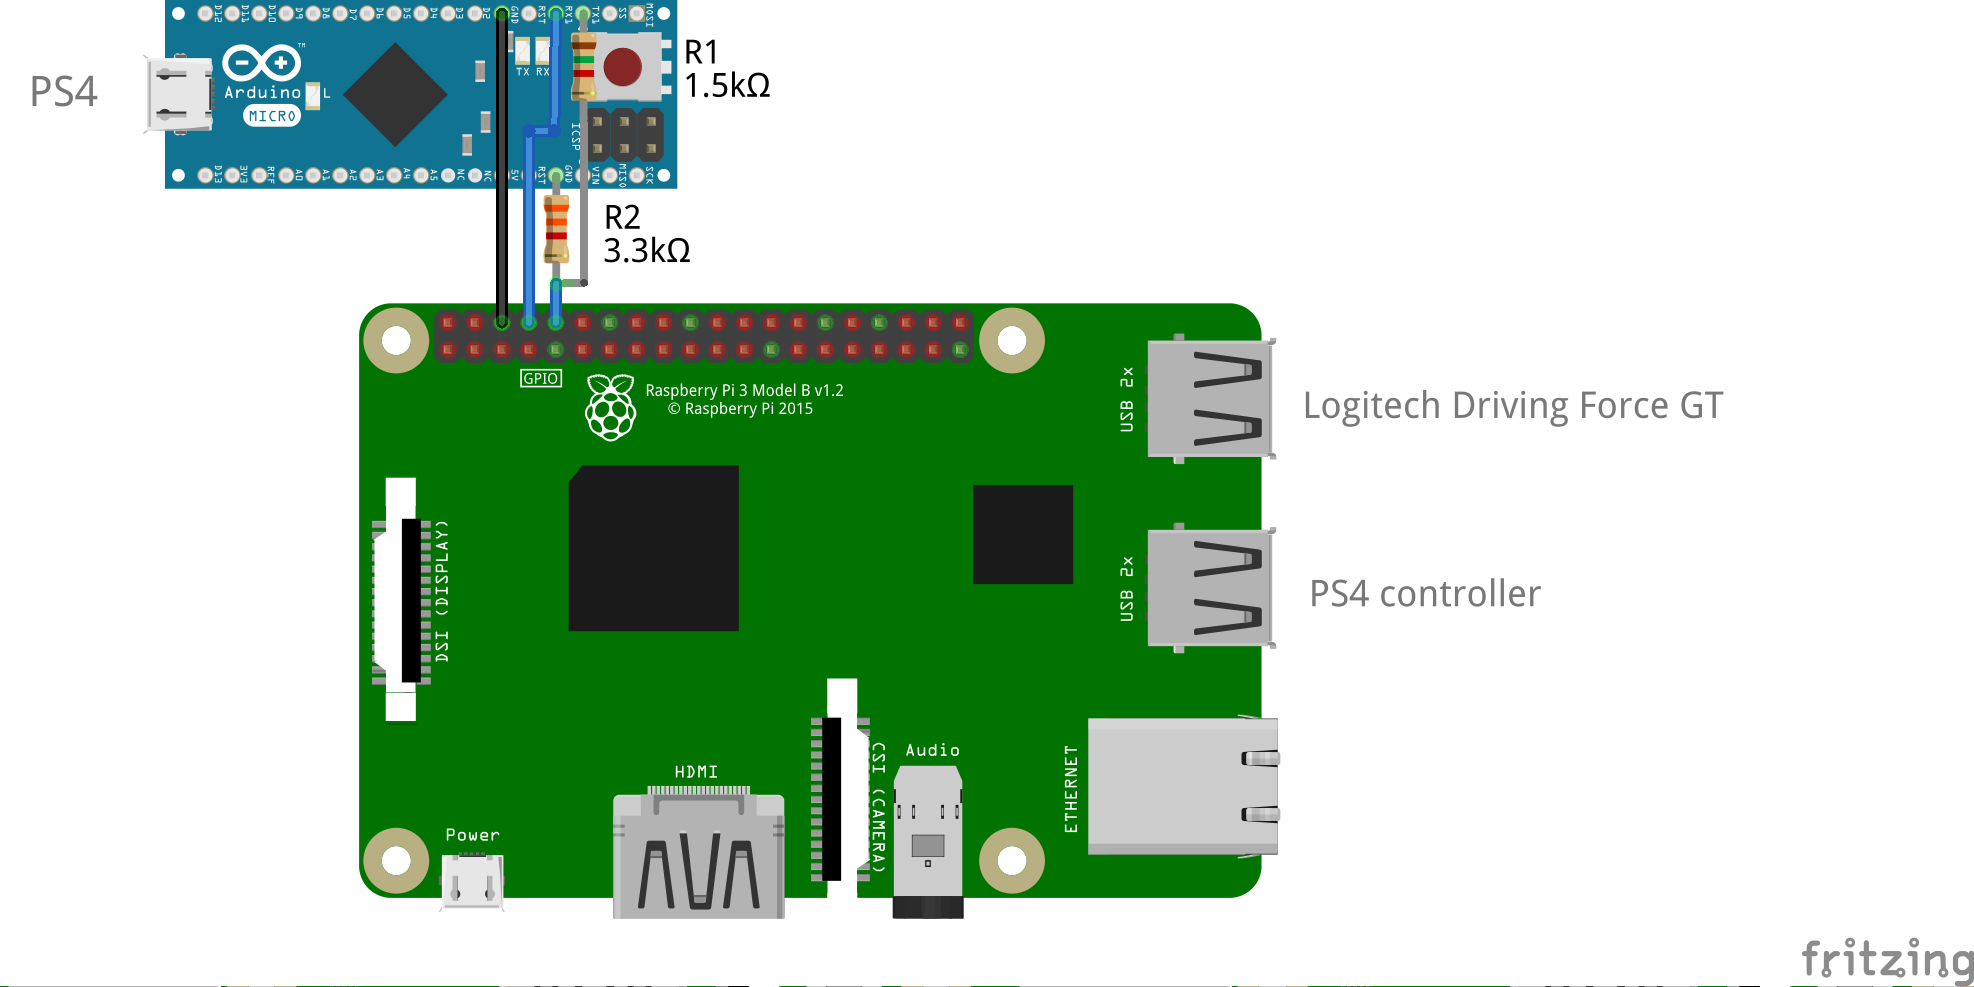
- per exemple, serveix per a connectar un volant «Logitech Driving Force GT» (dissenyat per a PS3) a una PS4 / can be used to connect a "Logitech Driving Force GT" (designed for PS3) to PS4
- Wiki
- RPi
- Logitech
Wheels
- Driving Force GT
- Info
- Source
- matlo / GIMX
- Compilació / Compilation
- Development on Linux
- dependencies
- Mageia
urpmi lib64wxgtku2.8-devel
- Mageia
git clone https://github.com/matlo/GIMX.git- gimx-loader
cd loadermakesudo make install
- Connexions:
option
peripheral computer
adapter (part I)
adapter (part II)
Playstation
step
peripheral connector
computer
connector
connector
device
connector
connector
device
connector
connector
Playstation
USB
USB
bluetooth USB dongle
(bluetooth)
PS3
USB PS3
1. pairing
AVR USB board
2. playing
bluetooth USB dongle
(bluetooth) PS4
Linux
USB USB
USB - UART
- CP 2102
- ...
UART
Rx/Tx (5V) AVR USB board
USB PS4
- Logitech Driving Force GT
- PS4 original controller
USB
RPi
RXD (3.3V)
Vout (3.3V)
voltage divider
(R1=2.2kΩ, R2=3.3kΩ)
Vin (5V)
Tx (5V, 16MHz)
AVR USB board USB micro
USB PS4
TXD
cable
Rx
GND
cable
GND Aquesta taula continua cap a la dreta — desplaça-la o gira el mòbil.
- GIMX adapter:
- Part I:
- quan es fa servir una Raspberry Pi: divisor de corrent connectat al GPIO/ when using a Raspberry Pi: voltage divider connected to GPIO
- quan es fa servir un PC: adaptador USB-UART / when using a PC: USB-UART adapter
- Part II: AVR
USB board (atmega32u4)
- Teensy 2.0
- Arduino
based on ATmega32U4
- Models
- Firmware
upload to board (Firmware
loading) (Force
feedback)
- Using
gimx-launcher
- Install
gimx-launcher
- Windows
- Ubuntu
- from source
- Install
gimx-launcher
- Using avrdude
- download gimx-firmwares
(firmwares-8.0.zip) or get the single
hex file from GIMX/loader/firmware
(used by gimx-launcher)
-
console
hex file
dispositiu / device PS2
EMUDFPPS2.hex Logitech Driving Force Pro emulation, for PS2, with force feedback support (may work with PC as target) EMUDFPS2.hex Logitech Driving Force emulation, for PS2, with force feedback support (may work with PC as target) EMUGTFPS2.hex Logitech GT Force emulation, for PS2, with force feedback support(may work with PC as target) PS3
EMUJOYSTICKPS3.hex 16bit stick axes, for PS3 EMUPS3.hex Sixaxis emulation, for PS3 EMUG27PS3.hex Logitech G27 gaming wheel emulation, for PS3, with force feedback support (does not work with PC as target) EMUJOYSTICKPS3.hex HID joystick emulation, with 16bit stick axes, for PS3 PS4
EMUPS4.hex Hori Pad FPS Plus emulation, for PS4 (with touchpad support) EMUG29PS4.hex Logitech G29 gaming wheel emulation, with force feedback support for Logitech wheels (G27, G25, Driving Force GT...) (does not work with PC as target) EMUT300RSPS4.hex
Xbox 360 EMU360.hex 360 pad emulation, for Xbox 360 Xbox One
EMUXONE.hex Xbox One pad emulation, for Xbox One PC
EMUG27PC.hex Logitech G27 gaming wheel emulation, for PC, force feedback support Aquesta taula continua cap a la dreta — desplaça-la o gira el mòbil.
-
- install using Arduino tools: avrdude
export ARDUINO_ROOT=/disc/Baixades/arduino-1.8.13- export
GIMX_ROOT=
/disc/src/GIMX - Arduino
Micro:
stty -F /dev/ttyACM0 1200 && sleep 1 && ${ARDUINO_ROOT}/hardware/tools/avr/bin/avrdude -C${ARDUINO_ROOT}/hardware/tools/avr/etc/avrdude.conf -v -patmega32u4 -cavr109 -P/dev/ttyACM0 -b57600 -D -Uflash:w:${GIMX_ROOT}/loader/firmware/EMUG29PS4.hex:i
${ARDUINO_ROOT}/hardware/tools/avr/bin/avrdude -C${ARDUINO_PATH}/hardware/tools/avr/etc/avrdude.conf -v -patmega32u4 -cavr109 -P/dev/ttyACM0 -b57600 -D -Uflash:w:/tmp/gimx/firmwares-5.8/EMU.../atmega32u4.hex:i${ARDUINO_ROOT}/hardware/tools/avr/bin/avrdude -C${ARDUINO_PATH}/hardware/tools/avr/etc/avrdude.conf -v -patmega32u4 -cavr109 -P/dev/ttyACM0 -b57600 -D -Uflash:w:/tmp/gimx/EMU....hex:i
- download gimx-firmwares
(firmwares-8.0.zip) or get the single
hex file from GIMX/loader/firmware
(used by gimx-launcher)
- Using
gimx-launcher
- Part I:
- Raspberry
Pi
- RPi
- GIMX
- Info
- GIMX adapter:
- Part I:
- USB adapter using the on-board UART interface
- maquinari / hardware
- programari / software
- Disable RPi UART as a serial console
(but enable UART):
sudo raspi-config- 3 Interface options
- P6 Serial Port
- Would you like a login shell to be accessible over serial? No
- Would you like the serial port hardware to be enabled? Yes
- P6 Serial Port
- 3 Interface options
- Enable high baudrates:
sudo nano /boot/config.txtinit_uart_clock=8000000
sudo reboot
- Disable RPi UART as a serial console
(but enable UART):
- Part II: AVR USB board
- Part I:
- GIMX software:
- Install
wget
                                      https://gimx.fr/download/gimx-raspbian -O
                                      gimx.deb
sudo dpkg --force-overwrite -i gimx.debsudo apt update && sudo apt -f install
- Disable Triggerhappy (it consumes CPU)
sudo systemctl stop
                                      triggerhappy.service
sudo systemctl disable triggerhappy.service
- Run
- GUI
- Autostart
GIMX at boot without GUI
sudo -imkdir -p ~/.gimx/configcd ~/.gimx/configwget https://raw.githubusercontent.com/matlo/GIMX-configurations/master/Linux/LogitechDrivingForceGT_G29.xml- /etc/systemd/system/gimx.service
[Unit]

                                              Description=GIMX

                                              After=syslog.target network.target


                                              [Service]

                                              User=pi

                                              Type=simple

                                              # using USB-UART adapter

                                              #ExecStart=/usr/bin/gimx -p
                                              /dev/ttyUSB0 -c
                                              LogitechDrivingForceGT_G29.xml
                                              --nograb

                                              # using the on-board UART
                                              interface

                                              ExecStart=/usr/bin/gimx -p
                                              /dev/ttyAMA0 -c
                                              LogitechDrivingForceGT_G29.xml
                                              --nograb

                                              Restart=always

                                              RestartSec=5


                                              [Install]

                                              WantedBy=multi-user.target
sudo systemctl daemon-reloadsudo systemctl enable gimx && sudo systemctl start gimx
- Install
- LED
- Notify
when GIMX is running using a led
- hardware
- software
- /home/pi/blink.py
#!/usr/bin/python

                                              import os

                                              import time

                                              import RPi.GPIO as GPIO


                                              led = 23

                                              button = 18

                                              GPIO.setmode(GPIO.BCM)

                                              GPIO.setup(led, GPIO.OUT)

                                              GPIO.setup(button, GPIO.IN,
                                              pull_up_down = GPIO.PUD_UP)


                                              def Shutdown(channel):

                                                GPIO.output(led, True)

                                                time.sleep(0.2)

                                                GPIO.output(led, False)

                                                time.sleep(0.2)

                                                GPIO.output(led, True)

                                                time.sleep(0.2)

                                                GPIO.output(led, False)

                                                os.system("sudo shutdown -h
                                              now")


                                              GPIO.add_event_detect(18,
                                              GPIO.FALLING, callback = Shutdown,
                                              bouncetime = 2000)


                                              while True:

                                                found = False

                                                time.sleep(5)

                                                pids = [pid for pid in
                                              os.listdir('/proc') if
                                              pid.isdigit()]

                                                for pid in pids:

                                                  try:

                                                    cmd
                                              = open(os.path.join('/proc', pid,
                                              'cmdline'), 'rb').read()

                                                    if
                                              "gimx" in cmd:


                                              found = True

                                                  except IOError:
                                              # proc has already terminated


                                              continue

                                                if found == True:


                                              GPIO.output(led, True)

                                                else:


                                              GPIO.output(led, False)
crontab -e@reboot python /home/pi/blink.py &
- /home/pi/blink.py
- Turning
on an LED with your Raspberry Pi's GPIO Pins
- The Raspberry Pi's GPIO Pins
- Notify
when GIMX is running using a led
- RPi
- GIMX
07Remote Play#
- Chiaki
- Instal·lació / Installation
- Platform-specific build instructions
- Dependències / Dependencies
- Mageia
sudo urpmi make cmake
                                  lib64qt5multimedia-devel lib64qt5opengl-devel
                                  python3-protobuf ffmpeg-devel
- Mageia
cd ~/src
git clone https://git.sr.ht/~thestr4ng3r/chiakicd chiakigit submodule update --initmkdir build && cd buildcmake ..makesudo make install
- ...
- Instal·lació / Installation
http://www.francescpinyol.cat/playstation.html
Primera versió: / First version:
Darrera modificació: 25 de desembre de 2024 / Last update: 25th
December 2024